Tampilkan postingan dengan label Ponsel. Tampilkan semua postingan
Selasa, 19 Juni 2012
Official UEFA EURO 2012 App v2.0.1 (OS 5.0-7.1)
0
22.48 in Ponsel
Minggu, 03 Juni 2012
Bible Plus v1.9 (OS 4.5-7.1) + Data Alkitab Bhs. Indo
0
04.21 in Ponsel
| Author | jelounge |
| Author email | jelounge@antihackerlink.or.id |
| Author website | http://compactbyte.com/bb-bible/download/ |
| Description | Readme 1. Install Bible Plus sesuai OS BB Anda 2. Copy folder 'Alkitab Bahasa Indo' yg disertakan dalam arsip ini ke SDCard 3. Buka Bible Plus - Menu - Add Bible 4. Pilih NO aja 5. Browse ke folder 'Alkitab Bahasa Indo' yg td anda copy dan add file 'tb1.PDB' 6. DONE... GBU! |
| Filesize | 1.06 MB |
| Date | Wednesday 14 March 2012 - 23:39:58 |
| Downloads | 2127 |
| Download | |
Rabu, 02 Mei 2012
COMMUNILATOR PRO - Universal Translator 1.0.0
1
20.48 in Ponsel
COMMUNILATOR
PRO adalah aplikasi blackberry yang berfungsi untuk menerjemahkan
sebuah teks dari bahasa tertentu ke bahasa yang anda inginkan, termasuk
bahasa ingris ke bahasa indonesia atau sebaliknya. COMMUNILATOR PRO -
Universal Translator 1.0.0 adalah versi terbaru dari COMMUNILATOR PRO
(17 Januari 2012).
Berikut ini fitur fitur dari COMMUNILATOR PRO :
1. Bisa menerjemahkan ke 54 bahasa berbeda : sumber teks yang akan di terjemahkan bisa berasal dari email, sms, copy, dan foto
2. Bisa menerjemahkan teks yang diambil dengan camera blackberry anda
3. Dilengkapi fitur hasil terjemahan dalam bentuk suara / audio dan masih banyak lagi
Perlu di perhatikan :
1. COMMUNILATOR PRO membutuhkan koneksi internet untuk menerjemahkan
2. Fitur terjemahkan sms harus sudah os6 atau diatasnya
Download otanya disini : COMMUNILATOR PRO - Universal Translator 1.0.0Download offlinenya disini : COMMUNILATOR PRO - Universal Translator 1.0.0
COMMUNILATOR
PRO adalah aplikasi blackberry yang berfungsi untuk menerjemahkan
sebuah teks dari bahasa tertentu ke bahasa yang anda inginkan, termasuk
bahasa ingris ke bahasa indonesia atau sebaliknya. COMMUNILATOR PRO -
Universal Translator 1.0.0 adalah versi terbaru dari COMMUNILATOR PRO
(17 Januari 2012).Berikut ini fitur fitur dari COMMUNILATOR PRO :
1. Bisa menerjemahkan ke 54 bahasa berbeda : sumber teks yang akan di terjemahkan bisa berasal dari email, sms, copy, dan foto
2. Bisa menerjemahkan teks yang diambil dengan camera blackberry anda
3. Dilengkapi fitur hasil terjemahan dalam bentuk suara / audio dan masih banyak lagi
Perlu di perhatikan :
1. COMMUNILATOR PRO membutuhkan koneksi internet untuk menerjemahkan
2. Fitur terjemahkan sms harus sudah os6 atau diatasnya
Download otanya disini : COMMUNILATOR PRO - Universal Translator 1.0.0Download offlinenya disini : COMMUNILATOR PRO - Universal Translator 1.0.0
BlackBerry News 1.0.1.9 & 1.2.0.5
0
20.38 in Ponsel
BlackBerry News adalah aplikasi blackberry yang berfungsi untuk melihat
berita berita terbaru dari situs situs besar di dunia. Untuk sumber
berita dari indonesia ada dari detik, okezone, kompas, jakartapost dan
lain lain. Untuk sumber berita dari luar ada reuters, ap world dan masih
banyak lainnya.
Download otanya disini : Os5, Os6, Os7x
Download offlinenya disini : BlackBerry News
Download otanya disini : Os5, Os6, Os7x
Download offlinenya disini : BlackBerry News
Jumat, 20 April 2012
BlackBerry Messenger 6.2.0.44
0
23.05 in Ponsel
BlackBerry
Messenger adalah aplikasi blackberry yang berfungsi untuk melakukan
chating dengan pengguna blackberry lain. BlackBerry Messenger adalah
aplikasi paling penting dari sebuah blackberry (menurut saya mungkin
blackberry gak akan selaris ini kalau bbm tidak ada). BlackBerry
Messenger 6.2.0.44 merupakan update versi terbaru dari BlackBerry
Messenger (17 April 2012).
Download otanya disini : BlackBerry Messenger 6.2.0.44Download offlinenya disini : BlackBerry Messenger 6.2.0.44
BlackBerry
Messenger adalah aplikasi blackberry yang berfungsi untuk melakukan
chating dengan pengguna blackberry lain. BlackBerry Messenger adalah
aplikasi paling penting dari sebuah blackberry (menurut saya mungkin
blackberry gak akan selaris ini kalau bbm tidak ada). BlackBerry
Messenger 6.2.0.44 merupakan update versi terbaru dari BlackBerry
Messenger (17 April 2012).Download otanya disini : BlackBerry Messenger 6.2.0.44Download offlinenya disini : BlackBerry Messenger 6.2.0.44
Advance OS and LED 12.0.3
0
23.01 in Ponsel
Advance
OS and LED adalah aplikasi blackberry yang berfungsi untuk mengubah
warna lampu notifilasi. Advance OS and LED 12.0.3 adalah update terbaru
dari Advance OS and LED (update 17 April 2012). Untuk versi sebelumnya
bisa dilihat disini Advance
OS and LED 11.2.1
Download otanya disini : Advance OS and LED 12.0.3Download offlinenya disini : Advance OS and LED 12.0.3
Advance
OS and LED adalah aplikasi blackberry yang berfungsi untuk mengubah
warna lampu notifilasi. Advance OS and LED 12.0.3 adalah update terbaru
dari Advance OS and LED (update 17 April 2012). Untuk versi sebelumnya
bisa dilihat disini Advance
OS and LED 11.2.1Download otanya disini : Advance OS and LED 12.0.3Download offlinenya disini : Advance OS and LED 12.0.3
Facebook 3.0.0.15
0
22.56 in Ponsel
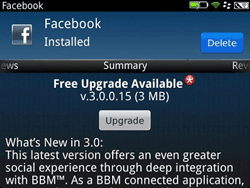
Facebook
adalah aplikasi blackberry yang memungkinkan anda untuk membuka dan
menggunakan facebook pada hand phone blackberry anda. Facebook 3.0.0.15
adalah versi terbaru dari aplikasi facebook yang dikeluarkan oleh rim.
Untuk versi terbaru ini facebook sudah bisa terintegrasi dengan
blackberry messenger / bbm
Download otanya disini : Facebook 3.0.0.15
Download offlinenya disini : Facebook 3.0.0.15
Facebook
adalah aplikasi blackberry yang memungkinkan anda untuk membuka dan
menggunakan facebook pada hand phone blackberry anda. Facebook 3.0.0.15
adalah versi terbaru dari aplikasi facebook yang dikeluarkan oleh rim.
Untuk versi terbaru ini facebook sudah bisa terintegrasi dengan
blackberry messenger / bbmDownload otanya disini : Facebook 3.0.0.15
Download offlinenya disini : Facebook 3.0.0.15
Jumat, 30 Desember 2011
Selasa, 19 Juli 2011
Install Android Mobile OS On PC
0
00.30 in Ponsel
Whether you are wanting to try out Android before actually purchasing a phone, or are just interested in the capabilities of the Android mobile OS, installing Android locally on your PC will give you a pretty good idea of what Android has to offer.
Previously, we posted tutorials on how to install Mac Snow Leopard on PC, and even install a Nintendo 64 emulator on PC. Here, we will guide you through the steps of installing a full fledged version of Android.

Prerequisites
As you may have guessed, Android does require a framework to run. So, if you do not already have Java installed on your computer, head on over to the Java homepage and download the latest release. After the download is complete, proceed to install Java onto your PC. A restart after installation may be in order.

After you’re all good to go with Java, the next step is to download the actual Android SDK (software developers kit). You can download it straight from the Google Android website.
Installing Android
Once the Android SDK download is complete, unzip the files and run the setup exe. It should be titled, SDK Setup.exe.

Once the installation is started, the installer will check Android servers for any available packages and updates.

**Important Note**
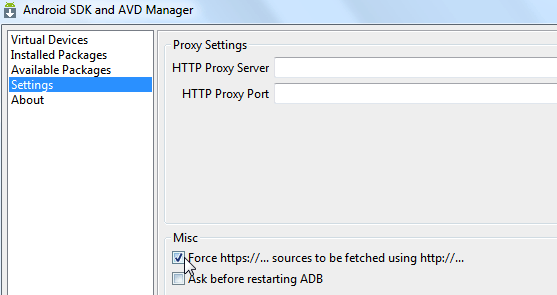
You may get an SSL error during installation. If you do, click the Settings tab of the Android SDK and AVD Manager window and uncheck the option Force https://… Click the OK button and reopen the setup. It should work properly this time, without error.

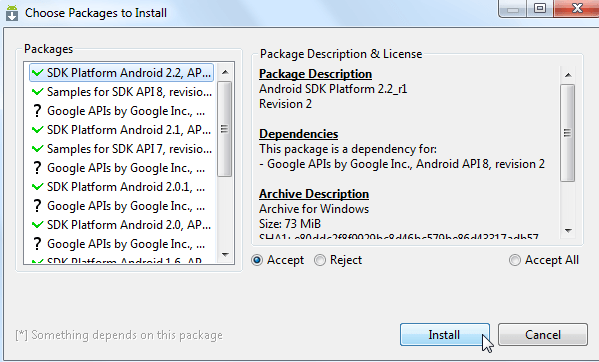
Still during installation, the Choose Packages to Install window will open. Here, you can decide and choose which exactly what you want to install. You will need to Accept the terms, and click Install to proceed with the rest of the SDK installation.

**Important Note**
By default, Android will have selected all SDK platforms and versions. You can choose to install all of the previous samples and APIs, but they are not necessary if you just want to try out Android. For most purposes, you will want to accept the latest version of Android for install, and reject the others.
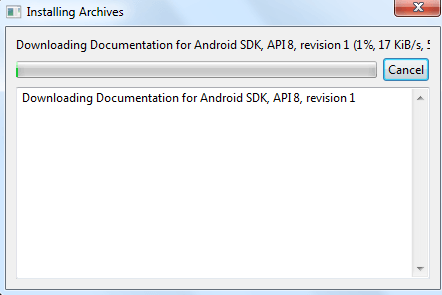
The Installing Archives download window will pop up, letting you know of the progress of your Android installation.

Setting Up Android
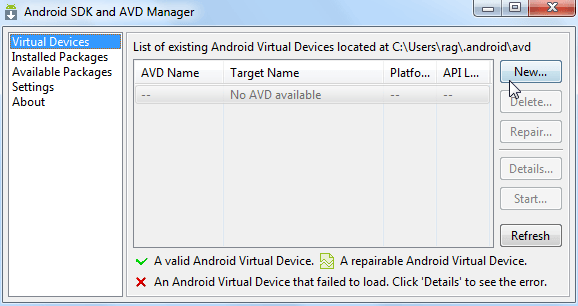
Once download and installation of the Android SDK is complete, you can get started with setting up your Android simulator. Select Virtual Devices from the left side menu of the Android SDK and and AVD Manager window, and click the New button.

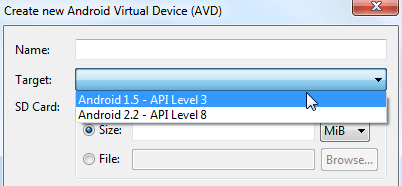
The Create new Android Virtual Device window will now open. Type in a name for your Android device, and select the version of Android that you’d like to use from the drop down target menu. Most likely, there will only be one version of Android to choose from in the target menu, if you only chose to download the latest version.

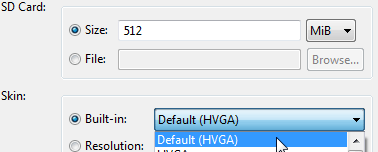
You will also need to enter a SD card size and select a screen size from the skin drop down menu. On an actual android phone, the SD card size would simply be the capacity of the SD card that you have inserted into the phone. Here, the emulator will simply create an IMG file to serve as a “virtual SD card”.

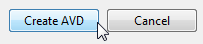
Once you have all of your settings selected, click the Create AVD button.

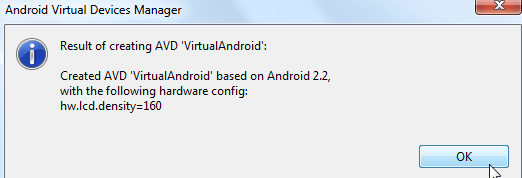
Android SDK will give you a confirmation prompt if you have done everything correctly.

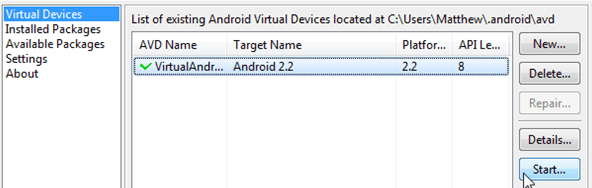
Now, it’s time to boot up your virtual Android device for the first time. Select your virtual Android machine under the AVD Name window, and click the Start… button.

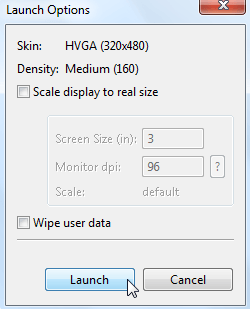
A Launch Options menu will appear, where you can scale the display to real size, and make adjustments to best fit your monitor or screen. Click the Launch button.

Now, you may need to wait a couple of minutes for Android to load, depending on the speed of your PC. Once it does load, you will be ready to go.

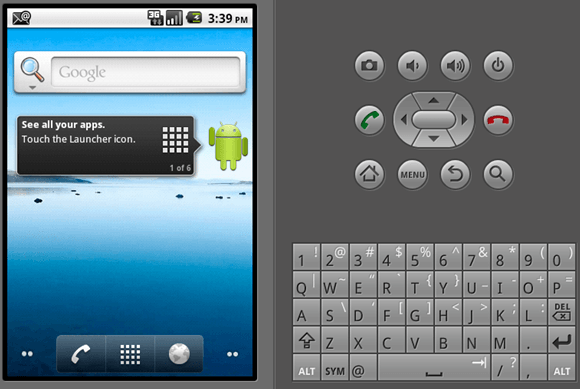
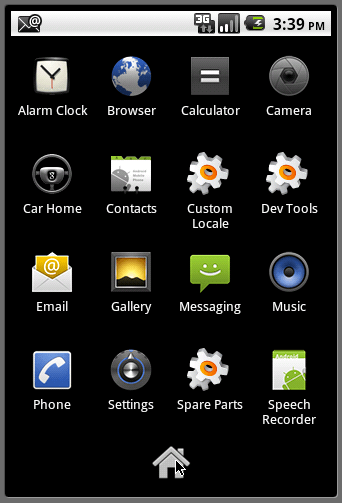
You’ve got the emulated phone screen, you’ve got the emulated dial pad, now you can test out all of Androids features from your PC!

Previously, we posted tutorials on how to install Mac Snow Leopard on PC, and even install a Nintendo 64 emulator on PC. Here, we will guide you through the steps of installing a full fledged version of Android.
Prerequisites
As you may have guessed, Android does require a framework to run. So, if you do not already have Java installed on your computer, head on over to the Java homepage and download the latest release. After the download is complete, proceed to install Java onto your PC. A restart after installation may be in order.
After you’re all good to go with Java, the next step is to download the actual Android SDK (software developers kit). You can download it straight from the Google Android website.
Installing Android
Once the Android SDK download is complete, unzip the files and run the setup exe. It should be titled, SDK Setup.exe.
Once the installation is started, the installer will check Android servers for any available packages and updates.
**Important Note**
You may get an SSL error during installation. If you do, click the Settings tab of the Android SDK and AVD Manager window and uncheck the option Force https://… Click the OK button and reopen the setup. It should work properly this time, without error.
Still during installation, the Choose Packages to Install window will open. Here, you can decide and choose which exactly what you want to install. You will need to Accept the terms, and click Install to proceed with the rest of the SDK installation.
**Important Note**
By default, Android will have selected all SDK platforms and versions. You can choose to install all of the previous samples and APIs, but they are not necessary if you just want to try out Android. For most purposes, you will want to accept the latest version of Android for install, and reject the others.
The Installing Archives download window will pop up, letting you know of the progress of your Android installation.
Setting Up Android
Once download and installation of the Android SDK is complete, you can get started with setting up your Android simulator. Select Virtual Devices from the left side menu of the Android SDK and and AVD Manager window, and click the New button.
The Create new Android Virtual Device window will now open. Type in a name for your Android device, and select the version of Android that you’d like to use from the drop down target menu. Most likely, there will only be one version of Android to choose from in the target menu, if you only chose to download the latest version.
You will also need to enter a SD card size and select a screen size from the skin drop down menu. On an actual android phone, the SD card size would simply be the capacity of the SD card that you have inserted into the phone. Here, the emulator will simply create an IMG file to serve as a “virtual SD card”.
Once you have all of your settings selected, click the Create AVD button.
Android SDK will give you a confirmation prompt if you have done everything correctly.
Now, it’s time to boot up your virtual Android device for the first time. Select your virtual Android machine under the AVD Name window, and click the Start… button.
A Launch Options menu will appear, where you can scale the display to real size, and make adjustments to best fit your monitor or screen. Click the Launch button.
Now, you may need to wait a couple of minutes for Android to load, depending on the speed of your PC. Once it does load, you will be ready to go.
You’ve got the emulated phone screen, you’ve got the emulated dial pad, now you can test out all of Androids features from your PC!
Install Blackberry Mobile OS On PC
0
00.28 in Ponsel

Prerequisites
BlackBerry emulators will require that you have the Java framework installed on your PC. So, head on over to the Java website and download and install the latest version of Java on your PC first. You may need to restart your computer after the Java installer completes.

Installation
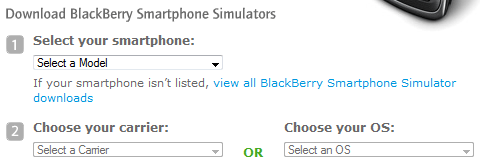
As mentioned above, installing a BlackBerry simulator on your PC is actually quite easy. To get started, head on over to the official BlackBerry developers page. Here, you will need to select some preferences, which will determine which specific BlackBerry emulator you will download.
Select your smartphone model from the first drop down menu, and select your carrier or OS version from the second and third drop down menus.

After you have selected your BlackBerry model, a download link will appear. Click the link to begin download.

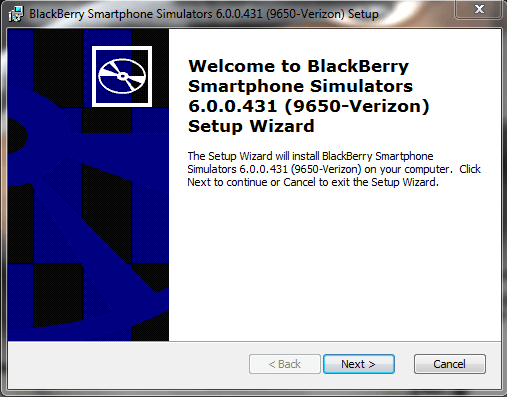
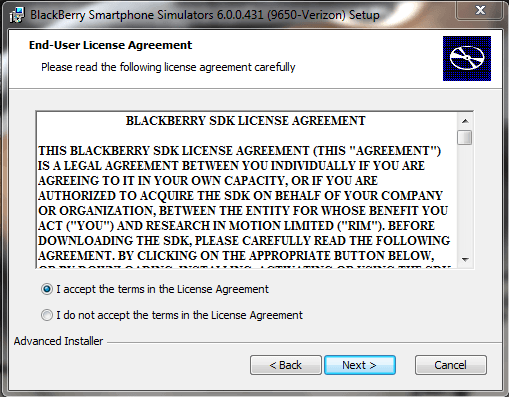
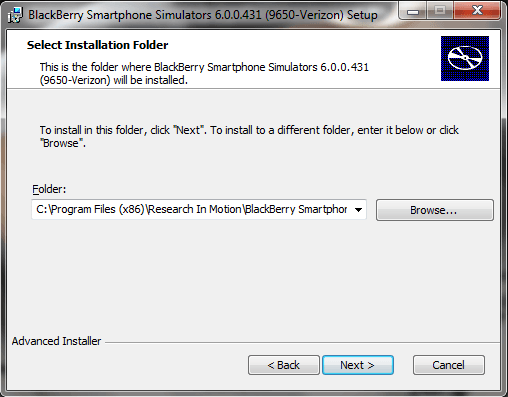
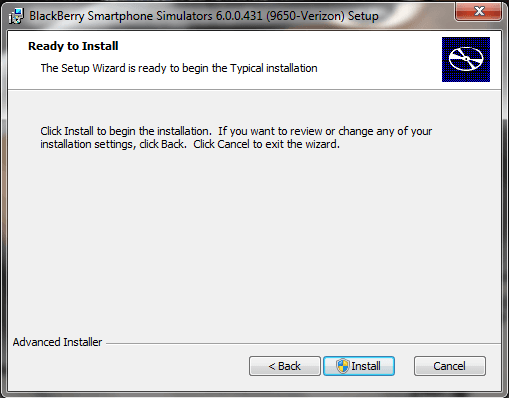
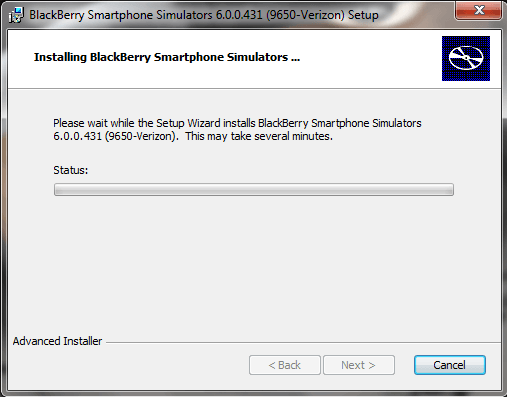
The download may take a couple of minutes, depending on the speed of your internet connection. After the download completes, double click the installer exe to get started. Installing the BlackBerry simulator on your computer is much the same as installing any other program. You will be presented with the usual installation steps.


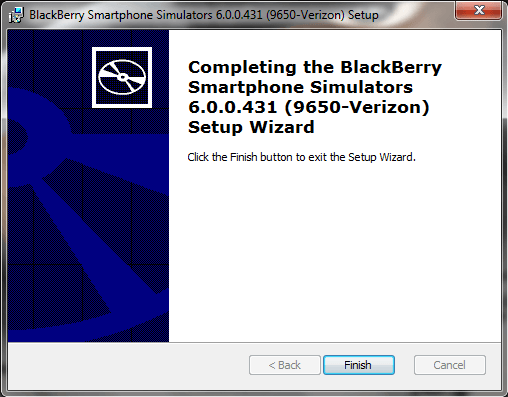
Once the setup Wizard completes, you will have successfully installed your specific BlackBerry emulator on PC. Next, it’s time to startup the emulator. Navigate to Start – All Programs – Research In Motion – BlackBerry Smartphone Simulators – Your Device.
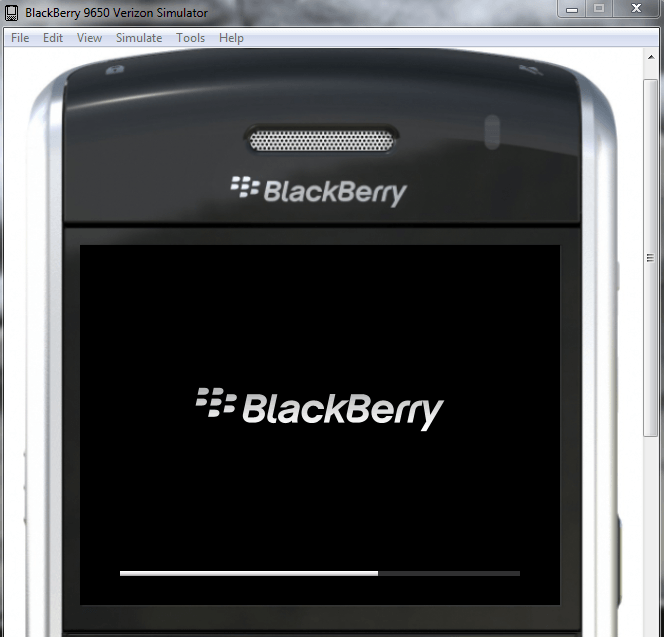
Once you select your device, it will automatically launch.

Once the virtual phone finishes loading, you will need to accept the BlackBerry agreement. From there, you will be presented with the BlackBerry home screen!

That’s all there is to it. Now you can explore the virtual BlackBerry device in the same way you would an actual phone. You can also browse through the options under Edit, View, and Simulate to change device settings.
Prerequisites
BlackBerry emulators will require that you have the Java framework installed on your PC. So, head on over to the Java website and download and install the latest version of Java on your PC first. You may need to restart your computer after the Java installer completes.
Installation
As mentioned above, installing a BlackBerry simulator on your PC is actually quite easy. To get started, head on over to the official BlackBerry developers page. Here, you will need to select some preferences, which will determine which specific BlackBerry emulator you will download.
Select your smartphone model from the first drop down menu, and select your carrier or OS version from the second and third drop down menus.
After you have selected your BlackBerry model, a download link will appear. Click the link to begin download.
The download may take a couple of minutes, depending on the speed of your internet connection. After the download completes, double click the installer exe to get started. Installing the BlackBerry simulator on your computer is much the same as installing any other program. You will be presented with the usual installation steps.
Once the setup Wizard completes, you will have successfully installed your specific BlackBerry emulator on PC. Next, it’s time to startup the emulator. Navigate to Start – All Programs – Research In Motion – BlackBerry Smartphone Simulators – Your Device.
Once you select your device, it will automatically launch.
Once the virtual phone finishes loading, you will need to accept the BlackBerry agreement. From there, you will be presented with the BlackBerry home screen!
That’s all there is to it. Now you can explore the virtual BlackBerry device in the same way you would an actual phone. You can also browse through the options under Edit, View, and Simulate to change device settings.
Kamis, 14 Juli 2011
SpiderMan crack
0
21.39 in Ponsel
Download link ( V2.67 )
Download link ( v3.53 )
http://www.4shared.com/get/n-m8AhyS/SpiderMan_Crack_v353_bydwicell.htmlDownload link ( V2.67 )
Minggu, 10 Juli 2011
mobileEx full cracked no Emulator
1
22.53 in Ponsel
mobileEx full cracked
no Emulator needed
No damaging the system
tested by me working 100/100
no Emulator needed
=
no problem in this version full crack
100/100 working
download three links size 28.3mb
mobileEx full cracked
no Emulator needed
No damaging the system
tested by me working 100/100
no Emulator needed
=
no problem in this version full crack
100/100 working
download three links size 28.3mb
Code:
http://www.ziddu.com/download/6145491/Setupfullcrackmxkey.part1.rar.html http://www.ziddu.com/download/6145489/Setupfullcrackmxkey.part2.rar.html http://www.ziddu.com/download/6145490/Setupfullcrackmxkey.part3.rar.html
Categories
- Anti Virus (22)
- Converter (3)
- Desain Grafis (6)
- Game (1)
- Ponsel (20)
- Software (29)
- Tools (2)
- Windows (8)